Hello everyone 👋 !! In this blog post, we will see how to implement Progressive Delivery with AWS AppMesh in EKS using Flagger. Before getting deep dive into the blog, let's see some of the concepts behind it. - Continuous Delivery, Continuous Deployment, Progressive Delivery.
Concepts
Continuous delivery — the capability of supplying artifacts such as binaries, container images, secrets, or runtime configurations in a safely automated, hands-off approach.
Continuous deployment — somewhat established, pulling said artifacts and launching them in a runtime environment such as Kubernetes, Amazon ECS, etc. At the time of publication, certain good practices such as immutable artifacts and multi-staged caching have been shared and adopted widely.
Progressive Delivery
Progressive delivery is modern software development for gradually rolling out new features to limit the potential negative impact and measure the metrics with newly deployed features. Progressive delivery builds on the foundation of continuous delivery and expands the practice to include feature rollouts, canary, a/b testing, blue-green deployments.
Progressive delivery makes your release process more resilient. It reduces the risk by doing incremental changes, and in each step, you are validating or doing manual approval to proceed to the next stage. Using this, you can deliver more frequently with confidence.
Flagger
Flagger is a progressive delivery tool that automates the release process for applications running on Kubernetes. It reduces the risk of introducing a new software version in production by gradually shifting traffic to the new version while measuring metrics and running conformance tests.
Flagger implements several deployment strategies (Canary releases, A/B testing, Blue/Green mirroring) using a service mesh (App Mesh, Istio, Linkerd) or an ingress controller (Contour, Gloo, NGINX, Skipper, Traefik) for traffic routing. For release analysis, Flagger can query Prometheus, Datadog, New Relic, CloudWatch, or Graphite, and for alerting, it uses Slack, MS Teams, Discord, and Rocket. Flagger can be configured with Kubernetes custom resources and is compatible with any CI/CD solutions made for Kubernetes.
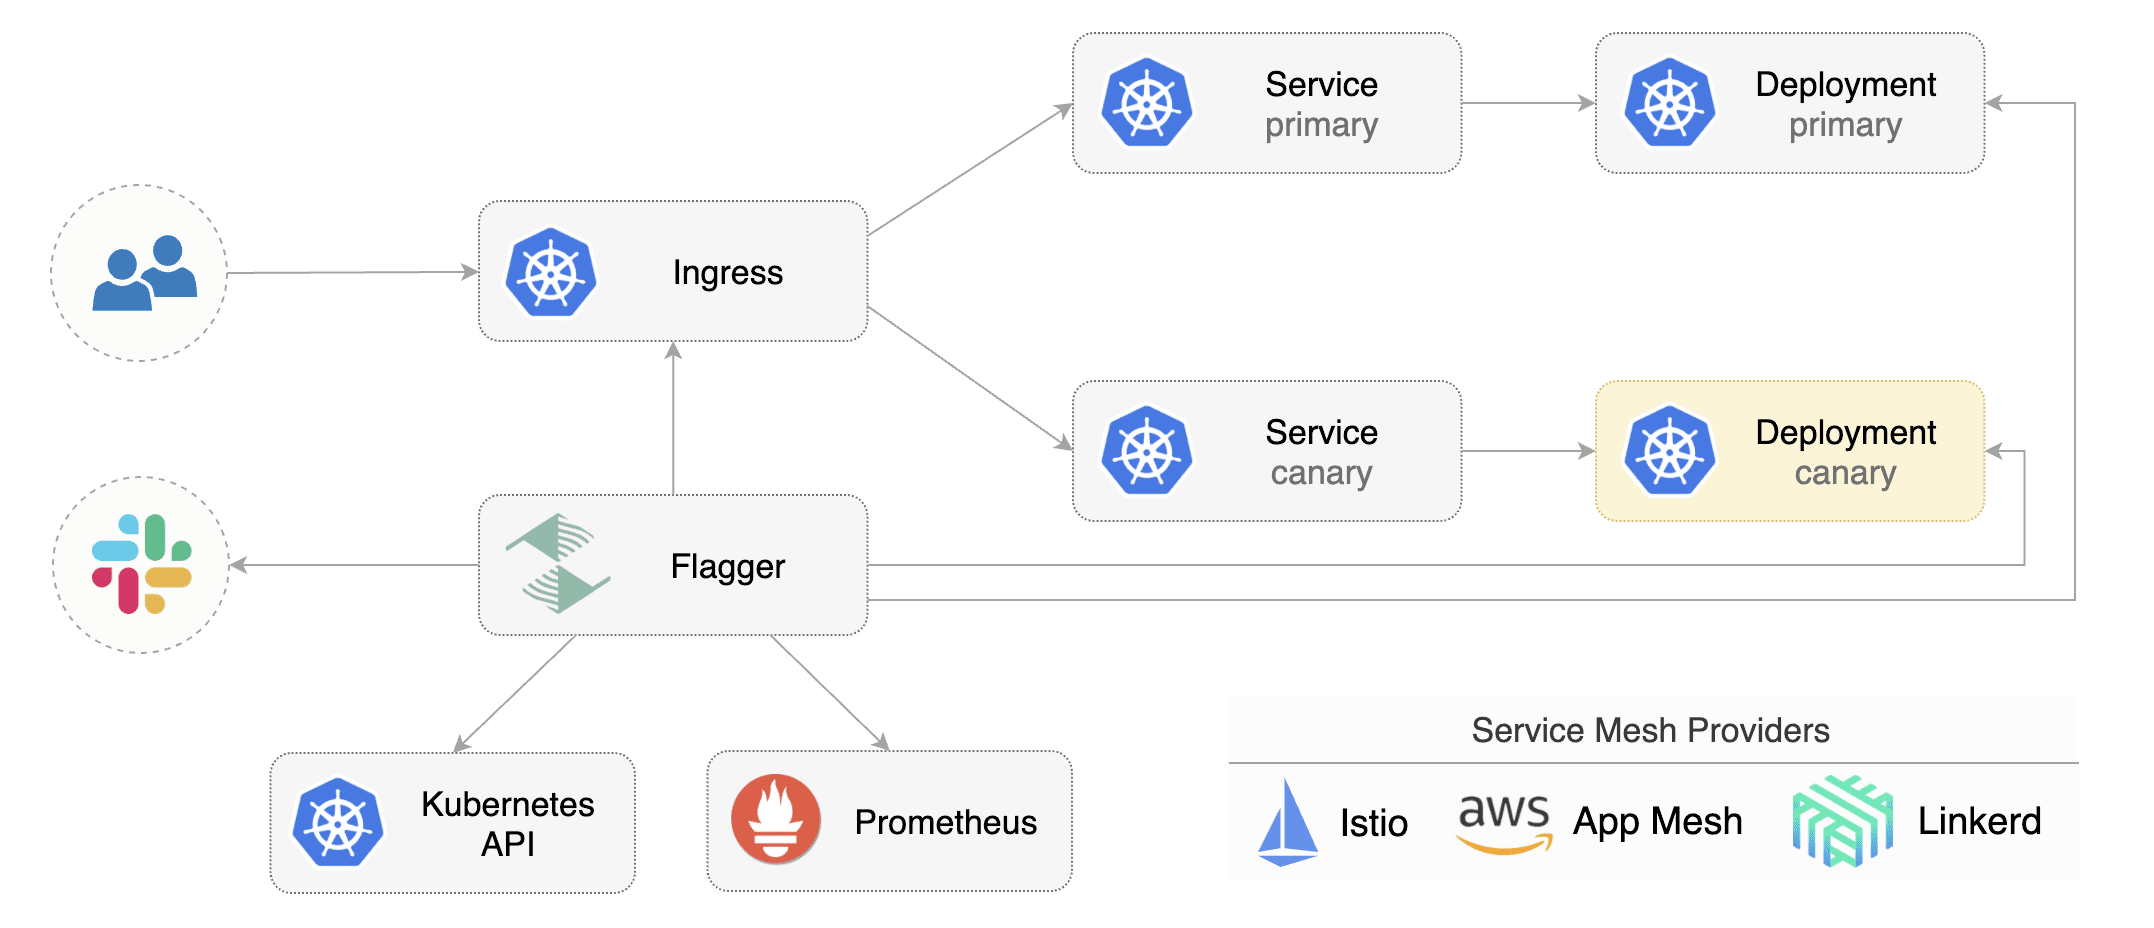 Image: Flagger
Getting Started
This blog walks you through setting up Flagger and AWS AppMesh on EKS. You can create the kubernetes cluster using portal or eksctl. Here we will use the eksctl - command-line tool to create or manage the EKS cluster.
Create an EKS Cluster
  eksctl create cluster --name=eks-dev \
  --region=us-east-1 \
  --nodes 3 \
  --appmesh-access
This command will create an EKS cluster with an appmesh IAM policy attached.
Installing AWS AppMesh
Add EKS helm repo
helm repo add eks https://aws.github.io/eks-chartsInstall the AppMesh CRDs
kubectl apply -k [github.com/aws/eks-charts/stable/appmesh-controller//crds?ref=master](http://github.com/aws/eks-charts/stable/appmesh-controller//crds?ref=master)Create a namespace called app-mesh
kubectl create ns appmesh-systemInstall the AppMesh Controller
  helm upgrade -i appmesh-controller eks/appmesh-controller \
  --wait --namespace appmesh-system
Install the Prometheus instance to collect the app mesh metrics to run the canary analysis.
  helm upgrade -i appmesh-prometheus eks/appmesh-prometheus \
  --wait --namespace appmesh-system
Installing Flagger
Add Flagger Helm repository
helm repo add flagger https://flagger.appInstall Flagger's Canary CRDs
kubectl apply -f https://raw.githubusercontent.com/fluxcd/flagger/main/artifacts/flagger/crd.yamlDeploy flagger in the appmesh-system namespaces. Please set the meshProvider to appmesh and the metricsServer to your Prometheus address.
  helm upgrade -i flagger flagger/flagger \
  --namespace=appmesh-system \
  --set crd.create=false \
  --set meshProvider=appmesh:v1beta2 \
  --set metricsServer=http://appmesh-prometheus:9090
Let's do the deployment
Install the deployment of your pod, including horizontal pod scaler. Here, I'm using one of the popular samples - pod info. Note, we are not installing any appmesh specific kubernetes API objects here. Flagger will be creating the appmesh virtualrouter, virtualservice based on the canary file we will create.
kubectl apply -k https://github.com/fluxcd/flagger//kustomize/podinfo?ref=main
Deploy the loadtest pod to run the load tests on the podinfo deployment
helm upgrade -i flagger-loadtester flagger/loadtester \
--namespace=test \
--set appmesh.enabled=true \
--set "appmesh.backends[0]=podinfo" \
--set "appmesh.backends[1]=podinfo-canary"
Setup Canary
Create a canary definition of the deployment we created. In this yaml, we are creating canary api targeting specific deployment. In analysis configuration, we are instructing canary analysis to do every 1m interval - and increase step weight to 5 to 50 based on request thresholds scraped from metrics.
apiVersion: flagger.app/v1beta1
kind: Canary
metadata:
  name: podinfo
  namespace: test
spec:
  provider: appmesh:v1beta2
  targetRef:
    apiVersion: apps/v1
    kind: Deployment
    name: podinfo
  service:
    # container port
    port: 9898
    timeout: 15s
    match:
      - uri:
          prefix: /
    rewrite:
      uri: /
  # define the canary analysis timing and KPIs
  analysis:
    # schedule interval (default 60s)
    interval: 1m
    # max number of failed metric checks before rollback
    threshold: 5
    # max traffic percentage routed to canary
    # percentage (0-100)
    maxWeight: 50
    # canary increment step
    # percentage (0-100)
    stepWeight: 5
    # App Mesh Prometheus checks
    metrics:
    - name: request-success-rate
      # minimum req success rate (non 5xx responses)
      # percentage (0-100)
      thresholdRange:
        min: 99
      interval: 1m
    - name: request-duration
      # maximum req duration P99
      # milliseconds
      thresholdRange:
        max: 500
      interval: 30s
Validation Testing on Progressing
And also, you can see webhooks configured to perform acceptance on pre rollout and load tests while canary traffic routing is performed.. This will run the load test on the canary deployment before progressing stages and call the pre rollout webhooks before routing traffic to the canary.
  analysis:
    ....
    webhooks: #optional
    - name: acceptance-test
      type: pre-rollout
      url: http://flagger-loadtester.test/
      timeout: 30s
      metadata:
        type: bash
        cmd: "curl -sd 'test' http://podinfo-canary.test:9898/token | grep token"
    - name: load-test
      url: http://flagger-loadtester.test/
      timeout: 5s
      metadata:
        cmd: "hey -z 1m -q 10 -c 2 http://podinfo-canary.test:9898/"
Successful Deployments
Trigger the canary deployment by updating the image version. The canary deployment will be triggered by deployment pod specs, configmaps and secrets.
kubectl -n test set image deployment/podinfo \
podinfod=stefanprodan/podinfo:3.1.1
Flagger detects the container version change and perform the canary analysis.
kubectl -n test describe canary/podinfo

Status:
  Canary Weight:         0
  Failed Checks:         0
  Phase:                 Succeeded
Events:
 New revision detected! Scaling up podinfo.test
 Waiting for podinfo.test rollout to finish: 0 of 1 updated replicas are available
 Pre-rollout check acceptance-test passed
 Advance podinfo.test canary weight 5
 Advance podinfo.test canary weight 10
 Advance podinfo.test canary weight 15
 Advance podinfo.test canary weight 20
 Advance podinfo.test canary weight 25
 Advance podinfo.test canary weight 30
 Advance podinfo.test canary weight 35
 Advance podinfo.test canary weight 40
 Advance podinfo.test canary weight 45
 Advance podinfo.test canary weight 50
 Copying podinfo.test template spec to podinfo-primary.test
 Waiting for podinfo-primary.test rollout to finish: 1 of 2 updated replicas are available
 Routing all traffic to primary
 Promotion completed! Scaling down podinfo.test
Automated Rollback
When the number of failed checks reaches the canary analysis threshold, the traffic is routed back to the primary, the canary is scaled to zero, and the rollout is marked as failed.
Conclusion
Progressive delivery unlocks rapid releases. Using flagger, it's more simple now to enable the automated canary deployments with your favorite service mesh you are using in your kubernetes cluster. It will give you full control over your feature rollout process. You can extend the progressive delivery process by extending the validation, manual approval, notifications to slack or MS teams, etc. We will take a look at extensible settings with approval and notifications in upcoming blog posts.